New Customer Portal Walkthrough 2026

Walkthrough of the Customer Portal for New TranscribeMe! Customers

TranscribeMe! has an easy-to-use Customer Portal where you can upload content and request transcripts. All customers need to have a Customer Portal account, either on our TranscribeMe portal, or on our TranscribeMe Web Client for our Secure File Transfer Protocal customers (HIPAA, Legal, Shared File company accounts) to be able to order transcription. This walkthrough will tell you how to set up a customer portal account directly on our web portal.

  a)  For our SFTP customers, you can follow this walkthrough for how to request an account to be created for you, and what steps will follow once the account is set up.
  b) Customer Portal accounts can also be created through our mobile phone apps for iPhone and Android that also let you make a recording. You can find the walkthrough for our iPhone mobile app here for the recorder and here for the call recorder apps. You can find the walkthrough for the Android recorder app here

Two Paths to Getting Started on the TranscribeMe! Portal Platform

This article will walk you through the main functionalities of how to create a new Customer Portal account. If you have additional questions after following this walkthrough, please contact support@transcribeme.com. Both paths start at our website,

Path A : The Old Fashioned Way! DIRECTLY SETTING UP THE CUSTOMER PORTAL FIRST

1

Create a Customer Portal account on our website: Please follow this detailed walkthrough for instructions on how to create a new Customer Portal account.

2

Once the Customer Portal is set up and you have logged in you will be taken to your default Home Recordings page:

TM Support/HelpScout/Screenshots/2026 Prep Walkthroughs for New Portal/Non Company CP Usage/NP First Look After Log In Jan 2026 Master.png

Path B : Use the new ORDER NOW to begin the Order process before setting up the Customer Portal Account

1

Upload and choose your Transcription type directly from the website before creating your Customer Portal account: Please follow this detailed walkthrough for instructions on how to use the Order Now process before creating your portal account.

TM Support/HelpScout/Screenshots/Portal Update Dec 2024/Order Now Access Button 2.png

Navigating Your Customer Portal

Once logged in, or after you have used the Order Now you will see the Portal Recordings home page. Detailed instructions on just about anything you need to know about how to prepare your audios, upload them using various methods, sorting your portal account using folders, downloading your transcripts, receipts, etc. can be found on our knowledge base here

1
Your Customer Portal Account has several aspects to it that you can use to order transcripts, track your orders, and control your billing information. The main focus of your Customer Portal account is your Recordings page, and therefore it is your home page. The other pages of interest can be navigated by clicking on the menu in the top right hand corner of the screen. 

TM Support/HelpScout/Screenshots/2026 Prep Walkthroughs for New Portal/Non Company CP Usage/NP different pages of CP Account SS 1.png

2
The Top Right Side Menu includes Home (Your recordings page), Orders (This provides the Order numbers for all orders that have been made) and your Account information on the single person icon.    

Uploading Files

1
In able to order transcripts you must first upload digital files, either as audio or video files, to your customer portal account. The Portal supports file uploads from your computer, Dropbox, and non-protected online media sites such as Vimeo.
  a)  To submit a file being stored in your Dropbox account, please click here for instructions. To submit online media hosted on a public, non-password-protected site such as Vimeo, please click here for instructions.

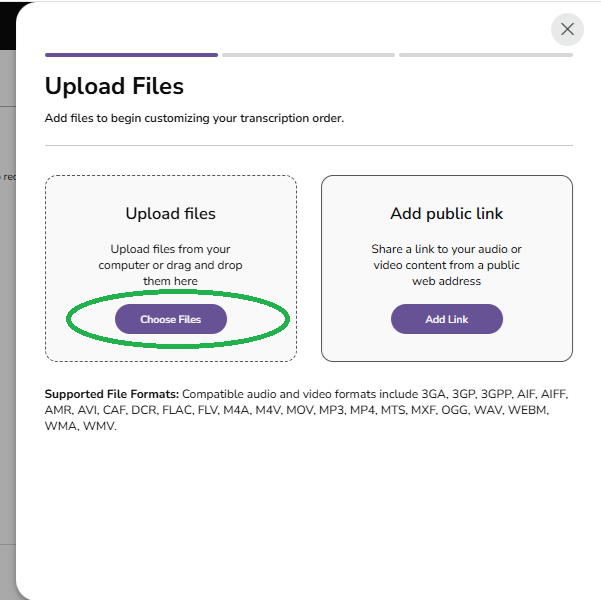
On the Recordings home page you will see an green Upload button. Before uploading make sure you know where your files are stored, they are all named correctly, and you have no duplications.  Remember that the price of transcription is based on per minute of audio, so ensure your files are trimmed to only include the audio portions you want transcribed. Then click the Upload button

TM Support/HelpScout/Screenshots/2026 Prep Walkthroughs for New Portal/Non Company CP Usage/NP Upload Files Button SS 1.png

Then click the Choose Files to button on the Upload files option.

TM Support/HelpScout/Screenshots/2026 Prep Walkthroughs for New Portal/Non Company CP Usage/NP Upload Files Button SS 2.png

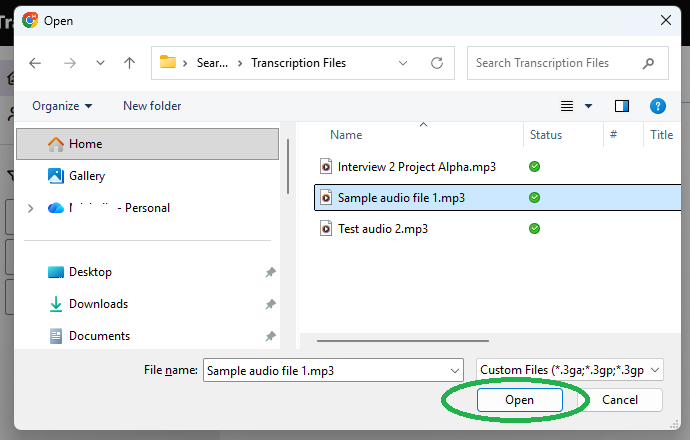
Navigate to the folder where the file is located, click on it, and click Open. You can select multiple files by holding down the Ctrl key while left-clicking with your mouse on each file you wish to upload.

TM Support/HelpScout/Screenshots/2026 Prep Walkthroughs for New Portal/Non Company CP Usage/NP Upload Files Button SS 3.png

2
You can see the progress of the upload on the screen as the file is transferred to the Portal. Video files are generally larger than audio files, so they may take slightly longer to upload. While your files are uploading, you can enter details it would be helpful for our team to know in the area provided. These can include the spelling of names, any useful acronyms, number of speakers, etc.

Please note that our system is optimized for files no larger than 500mb. We accept the following formats: wav, mp3, mp4, ogg, aiff, aif, m4a, mov, wma, avi, flv, 3gp, 3gpp, 3ga, amr, caf, m4v, and MXF.

TM Support/HelpScout/Screenshots/2026 Prep Walkthroughs for New Portal/Non Company CP Usage/NP Upload Files Button SS 4.png

TM Support/HelpScout/Screenshots/2026 Prep Walkthroughs for New Portal/Non Company CP Usage/NP Upload Files Button SS 5.png
Please note: Some new devices that produce certain formatted files, such as m4a, .wav, etc., cause a data transfer error and will result in distorted audio once processing has been completed. We recommend that any new m4a file should be converted to mp3 files prior to uploading to avoid this issue. You can see our walkthrough on how to prepare files for submission to our portal here.

Ordering files

1

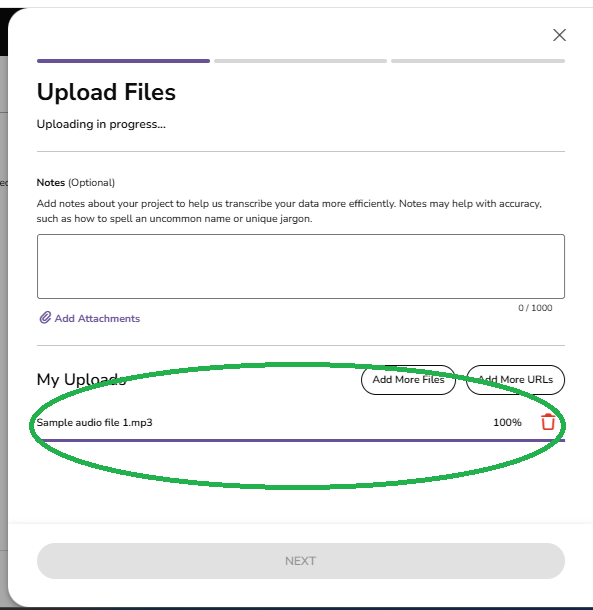
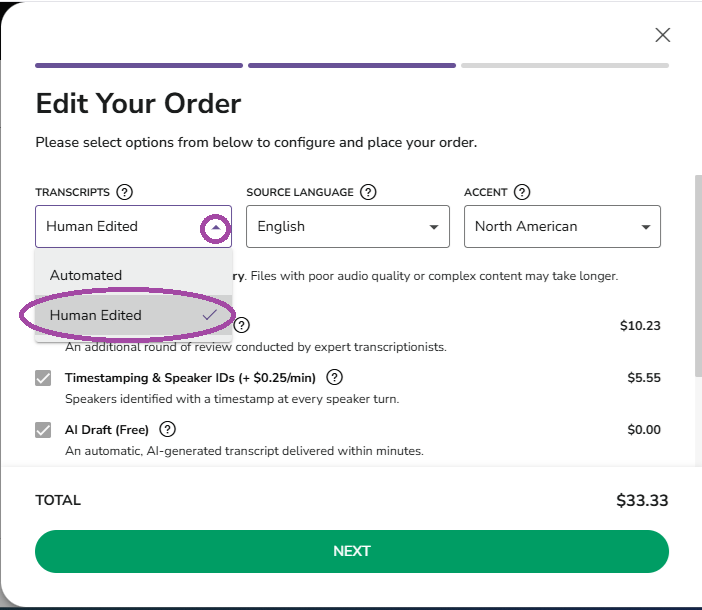
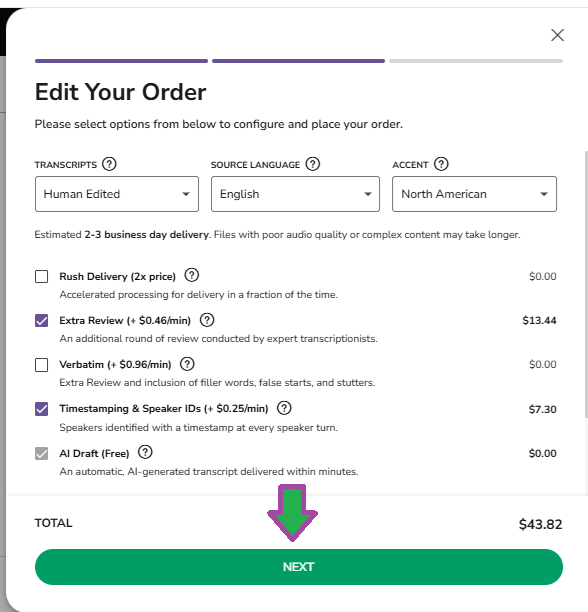
Once the audio file you have selected has finished converting the 'Next' button will turn green. Once you click the green button you will be taken to the The Order Details page which requires you to Edit Your Order. If you are not ready to Order at this time, you can push the 'X' in the upper right corner and it will take you back to your home page, showing your file you have uploaded with the status 'Ready to Transcribe' beside it.

TM Support/HelpScout/Screenshots/2026 Prep Walkthroughs for New Portal/Non Company CP Usage/NP Upload Files Button SS 6.png

2
To complete the Edit Your Order page you will need to ensure that the default options are the ones you want, and then select any additional features you need for your transcript, such as timestamps and speaker IDs, etc. Each additional feature adds a 'per miinute of audio' cost to the base purchace price. Your first choice is Type of Transcription Service, Automated or Human Edited? Choose from the drop down:

TM Support/HelpScout/Screenshots/2026 Prep Walkthroughs for New Portal/Choosing Product on Order SS 1.png

a
 Selecting the service type:
Service Types

Type

Best For:

Pros:

Cons:

Automated Transcription
High quality audio
No background noise
No crosstalk
1 or 2 speakers without accents
Economical
Extremely fast turnaround
High accuracy for very good audio
Timestamps are automatically added every 30 seconds

Speaker IDs not available
No Accuracy Guarantee
Human Edited Real-world audio with background noise or crosstalk
multiple speakers
accented speech
Crosstalk
Requires a quick turnaround
Economical
Default turnaround time is 2 to 3 business days, but 95% of these files are completed within 12 to 24 hours.
Typical accuracy ranges between 90 to 95% for average quality audio and often reaches close to 98% for good quality audio.
**Timestamps and Speaker IDs are available
No Accuracy Guarantee
Is a first draft of the audio,without a review layer for consistency, context, punctuation, or stylization.
Requires the customer to edit the transcript afterward, for which we provide an Online Editor.

ADDITIONAL FEATURES TO HUMAN EDITED TRANSCRIPTION TYPE
Extra Review best for real-world audio that has background noise, multiple speakers, accented speech, crosstalk and requires a high level of accuracy. *Comes with an Accuracy Guarantee

 Average turnaround time is 2 to 3 business days for audios 90 minutes in length or less & 4 or fewer speakers.

Uses Clean Verbatim where everything said is transcribed, but is 'cleaned' up to make the speech more readable, without changing the context or meaning of the speech. Eliminates crutch words (I know, like, okay), as well as filler words, (uh, um, mhmm, uh-uh, etc.), stutters, and false starts of 3 words or less.
More than 4 speakers, or lower quality audio will result in longer turnaround times.

Verbatim best for real-world audio that has multiple speakers, requires a high level of accuracy, and will be used for speech pattern analysis. *Comes with an Accuracy Guarantee

    The average turnaround time for this service is 2 to 3 business days for audios that are 60 minutes in length or less, and have 3 or fewer speakers

    This is a Full Verbatim service, meaning that everything that is said is transcribed with crutch words (I know, like, okay), as well as filler words, (uh, um, mhmm, uh-uh, etc.), stutters, and false starts of 3 words or less are included.
1 business day turnarounds are not available for this service.

4 or more speakers, low quality audio, crosstalk, background noise, and audios greater than 60 mins in length will result in extended turnaround times.

The transcript is harder to read and follow due to the idiosyncracies of human speech.
Timestamps and Speaker IDs Can be added to any Human Edited Service Helps make identifying areas of the transcript easier and allowing for searches within the transcript by speaker more efficient. Can become very convoluted with more than 8 speakers.
RUSH Turnaround 1 business day turnarounds are available for audios 70 minutes or less in length.  For clients who need their transcripts in a hurry but still want the higher accuracy of Extra Review, and timestamps and speaker IDs.  Is not available on longer audios or for Verbatim option.

Doubles the price.

*Accuracy Guarantee -

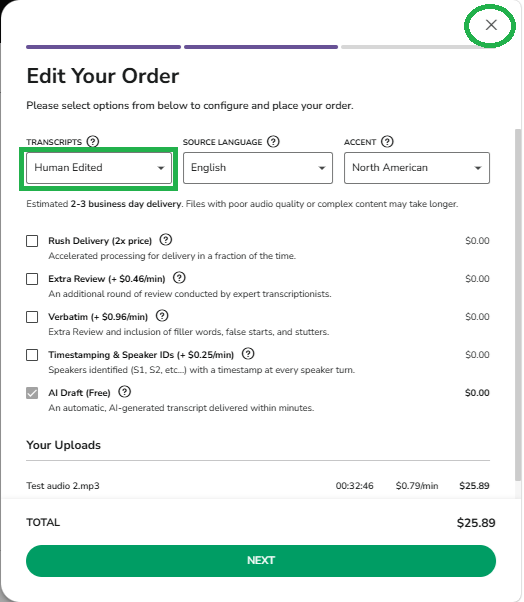
The Accuracy Gurantee means a guarantee of 98% accuracy using a Word Error Rate, for good quality audio. If you feel your transcript does not meet this accuracy rate just let us know and we will review the transcript for you. If it does not fall within the accuracy guarantee we will gladly redo it for you free of charge.

**Timestamps and Speaker IDs - Timestamps and Speaker IDs are available for an additional cost. Speaker IDs are formatted as 'S1', 'S2', 'S3', etc. in the order in which each speaker first speaks in the audio. Customized Speaker names can be arranged through our Sales team prior to ordering your files.

b
  Selecting the language of the source audio: Language - This is the language formating the transcript will be typed in and should correspond to the language of the speakers in the audio.

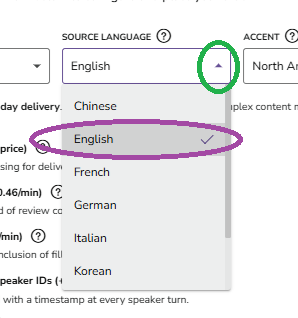
**If you have audio with people speaking more than one language, the language you choose here will be transcribed and the other language(s) will be indicated with a [foreign] tag. If you wish all languages to be transcribed, you must contact our sales department at sales@transcribeme.com to arrange for a bilingual quote prior to ordering.

TM Support/HelpScout/Screenshots/2026 Prep Walkthroughs for New Portal/Non Company CP Usage/NP Upload Files Button SS 7.png

Accent - This is the regional accent of the speakers and the transcript. It will therefore include spelling, punctuation, and regional differences depending on the accent selected. For example, English - North American will use the spelling 'color' but English - British will use the spelling 'colour'. 

TM Support/HelpScout/Screenshots/2026 Prep Walkthroughs for New Portal/Non Company CP Usage/NP Upload Files Button SS 8.png

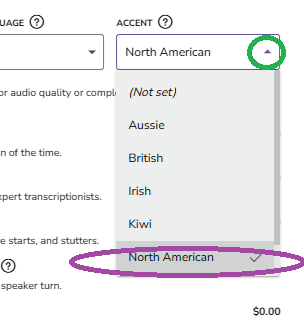
Both of these are usually defaulted when ordering but can be selected using the drop down arrows in the Edit Your Order page:

3
Other file characteristics such as flagging any heavy accents, content such as Medical or technical terminology are no longer part of our default ordering system. All specialty files and customized guidelines are now arranged ahead of time with our Sales team by contacing sales@transcribeme.com. Business teams that have contracts regarding invoicing, specialized domains, transcripts, etc. will have restricted options in ordering and should be discussed with your company administrator. 
4
Once you have made all your selections the button at the bottom of the window will turn green. Click that button to go to the Confirm Order Details page. 

TM Support/HelpScout/Screenshots/2026 Prep Walkthroughs for New Portal/Non Company CP Usage/NP Upload Files Button SS 9.png


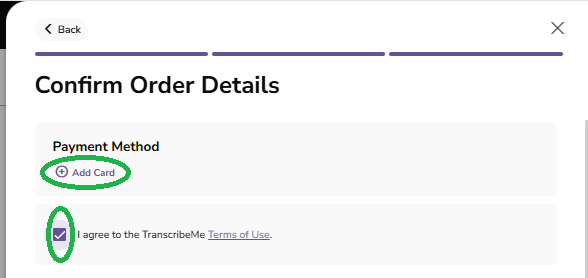
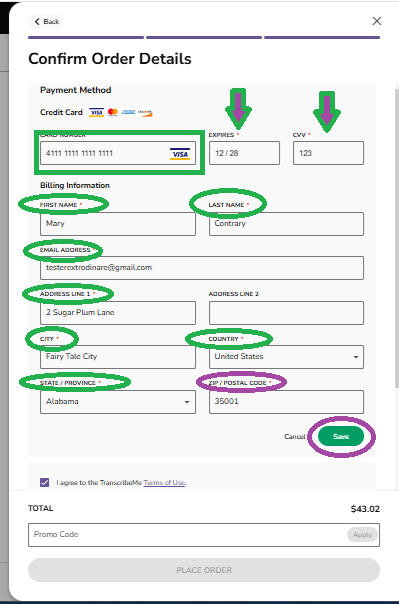
Paying for your Order

1
Once the Confirm Order Details window pops up, please look over the selections you have made. Also, if this is the first time you are ordering you will be asked to click the checkbox saying you agree to our terms of use. Please click on the link there to read the terms of use before agreeing to them. 
*Review your selections for your order: Your basic type (Automated or Human Edited), the language and the accent will be on the first line. Beneath these are the selections you have made. Each of these selections add a 'per minute' cost to your order. The total order cost is beside the word Total.

TM Support/HelpScout/Screenshots/2026 Prep Walkthroughs for New Portal/Non Company CP Usage/NP Upload Files Button SS 12.png

2

The Confirm Order Details window starts wtih the Payment Method. 

TM Support/HelpScout/Screenshots/2026 Prep Walkthroughs for New Portal/Non Company CP Usage/NP payment screen SS 2 Add Card.png

  a)  The default payment method is to pay by credit card. On this screen, if you have not added a credit card on your Account profile page, you will have to add the card by clicking 'Add card' for payment of this order.  If you have arranged for other payment methods with our Sales and Finance department prior to ordering, those options will be available to choose. Once you have clicked 'Add Card' a pop up window will appear. Add in all of the required information indicated below. Once the information has been entered correctly the 'Save' button will turn green. Click on that to return to the Confirm Order Details page.

TM Support/HelpScout/Screenshots/2026 Prep Walkthroughs for New Portal/Non Company CP Usage/NP Upload Files Button SS 14.png

  b) You can also click the 'I agree to the TranscribeMe Terms of Use' at this point. Please note, you will have to agree to the terms of use for each order, so please read them before agreeing. You can access the Terms of Use by clicking on the underlined purple words 'Terms of Use.' This has to be clicked before you can continue to place your order.
3
If you have arranged with Sales to be invoiced or set up a wallet, you will have that option under payment method and you will have put in a promo code. Sometimes, even if you pay by credit card you might have a promo code providing a discount, or a customized output but dictating pre-selected restrictions. In this case you will need to enter the promo code at this stage. 

Once you have entered the promo code click on the green Apply Promo' button. 

TM Support/HelpScout/Screenshots/2026 Prep Walkthroughs for New Portal/Non Company CP Usage/NP payment screen SS 3 Promo Code.png

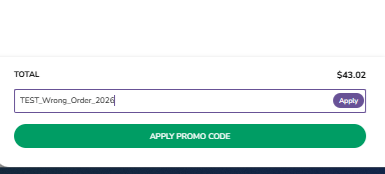
**If the Order details do not meet the pre-selected restrictions of the promo code you will see this error, and you will need to reach out to support to see which feature you will need to select to use the promo code.

TM Support/HelpScout/Screenshots/2026 Prep Walkthroughs for New Portal/Non Company CP Usage/NP Promo Code error SS 1.png

4
Once you have either successfully added your card, or applied a promo code, or both,  and agreed to the TranscribeMe terms of use, you will see the words 'PLACE ORDER' appear inside the button at the bottom of the screen, and the box will turn green. Once you are sure everything is in order, click that button.

TM Support/HelpScout/Screenshots/2026 Prep Walkthroughs for New Portal/Non Company CP Usage/NP Place Order Button SS 2.png

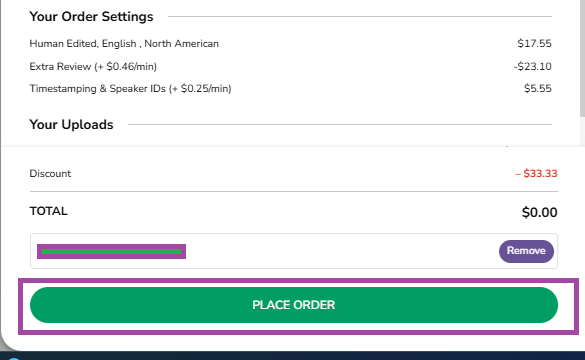
If you find there is anything you wish to change prior to clicking the PLACE ORDER button, you can hit the back key at the top right of the window to go to any of the previous screens and make adjustments. 

5

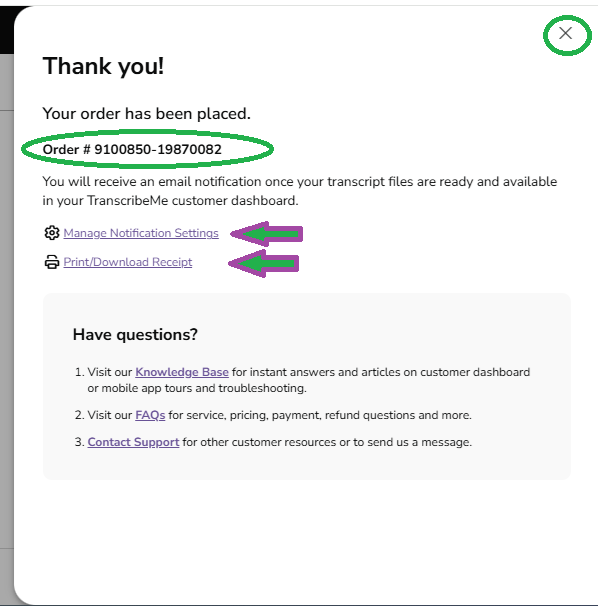
Once your order has been placed you will see a confirmation screen pop up. This lets you know your order was successfully placed and is being processed. It will provide your Order # for future reference. There are also 2 links that can be accessed if you wish. The first is to manage your Notification settings. What this does is allow you to have the completed transcript attached to the email notification that your file is completed. The second link allows you to download and print your receipt of the order. To return to your My Recordings page, click on the X at the top right of the pop window.

TM Support/HelpScout/Screenshots/2026 Prep Walkthroughs for New Portal/Non Company CP Usage/NP Place Order Button SS 3.png


6

For more detailed walkthroughs on other aspects of your Customer Portal you can take a look at our Knowledge Base on our website here

If you have additional questions after following this walkthrough, please contact support@transcribeme.com.

If you have an existing account, you can Log in by clicking the Customer login button at the top right hand corner of the home page on our website or by going directly to our Customer Portal Log in page.

Did this answer your question? Thanks for the feedback There was a problem submitting your feedback. Please try again later.